

Download this image, isolate the balloons, place a gradient on a layer underneath, and add large text to create a magazine cover.
Imagine that you have to create a magazine cover or an ad that will be 10 inches wide by 14 inches high. The problem is, you only have one very poor quality horizontal photo and the negative is scratched.
Download and open this inverted (negative) photo of a balloon race in Photoshop, Gimp or Photopea.
Photoshop:
- Image / Adjust / Invert (Change from color negative to positive)
- Image / Image Rotation / 90 degrees counter clockwise
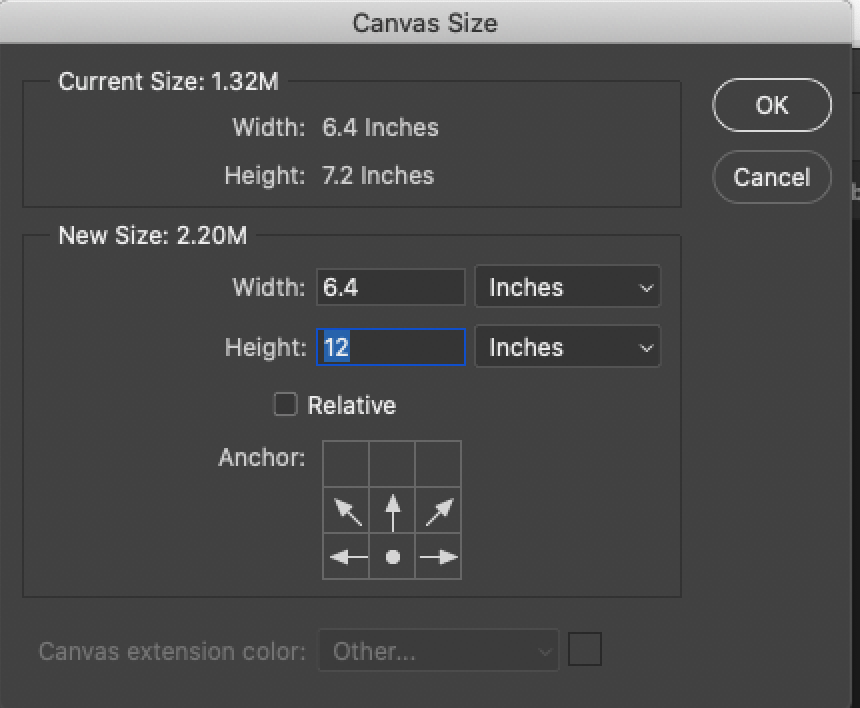
- Image / Canvas size / Make height 12 inches
- Special step for photoshop: UNLOCK the Background layer by double clicking on it. You should not see the lock icon on the layer, and rather than “background” you should see “Layer 0”
- Toolbar / Use magic wand – color select tool to select and delete all portions of the sky around the balloons (use the options bar and sensitivity around 32); Just hit the “delete” key to remove opaque areas.
- Create a layer underneath “Layer 0” (this will be “Layer 1).
- Toolbar / Use gradient tool to substitute a new sky image. Click, drag and release the tool.
- Toolbar / Use the “T” text tool and insert a large title for the magazine. Sans Serif is probably best.
- Save in “native” format (eg .psd for Photoshop), then flatten into a jpg, save that, and post the jpg to your site.
Gimp:
- Special steps for gimp:
- Right click on the layer and bring up the layers menu. About 2/3 of the way to the bottom of the menu, make sure you click on “Add Alpha Channel.” Right click to open Dialogue Box. Click on “Channel to selection.”
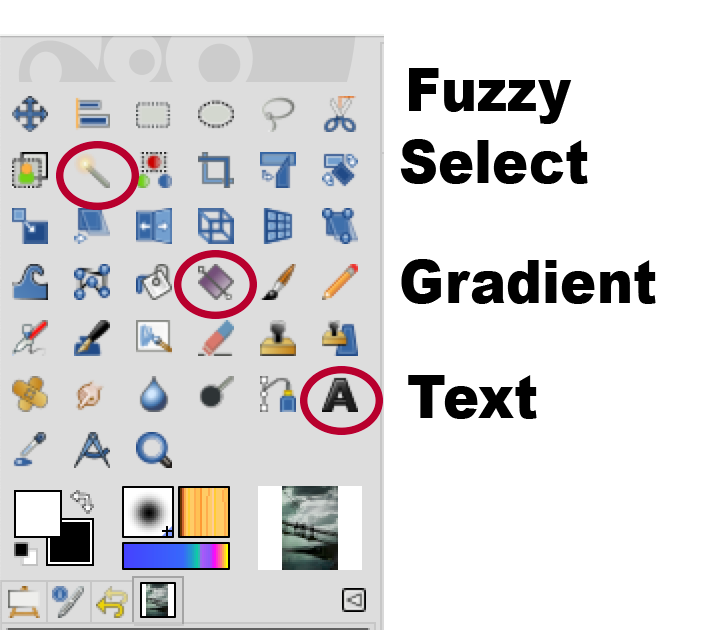
 Toolbar / Fuzzy Select Tool – Click on old sky and then use the delete key. (Edit/cut also works. Or Fn/Delete keys).
- Do this until everything but the balloons is gone. You should be seeing the checkerboard “alpha” layer underneath.
Special note: Fuzzy select doesnt work with all versions of Mac and Gimp. You may have to use the eraser tool instead. - Deselect all just to clear the selections.
(On the top menu: Select / None) - Colors / Invert (Change from color negative to positive)
- Image / Transform / 90 degrees counter clockwise
- Image / Canvas Size – Again, 11 inches high, but it’s not easy to guide the direction it grows in. You may need to double this and then use the crop tool to take off the bottom part.
- Create a new layer and put it under the Balloons layer. Make sure the new layer and its alpha channel are selected. You may have to “apply
- Toolbar / Gradient Tool (under Paint bucket) – Similar to photoshop. Click and drag. You can change the gradient pattern with the tool in place by clicking on the move buttons.
You may have to be sure to “Apply” the alpha channel. - Toolbar / Use the “A” text tool and insert a large title for the magazine. Sans Serif is probably best.
- Sometimes there are problems with Gimp. If you have problems with your gradient tool, you may need to add a layer mask to the main image and select click on Layer’s alpha channel in the dialogue box.
- Save in “native” format (eg .xcf for Gimp), then flatten into a jpg, save that, and post the jpg to your site.