
Goal: Create a simple single page flyer with a headline, a photo, a cutline, and two text columns. Export as png and also as a low-resolution pdf, then upload both pnd and pdf on your web page. Place the png on your web page and link it to your pdf.
- Open InDesign, select New Document, select your page size (8.5 x 11.5 inches) and number of pages (1), select 1/2 inch margins all around, and now name & save this new file.
- Layout: At the top menu under Layout, pull down to “Margins & Columns” and set the number of Columns to 2. This will give you column guides. (Note that the gutter between columns can be changed. The default is usually 0.1667, which is one sixth of an inch, aka one “pica,” or 1p0 )
- Workspace: Go to the top menu, select Window / Workspace and select Digital Publishing. This arranges the workspace tools you need. (* For orientation, go to this Adobe page and watch #3, about the Indesign workspace. *)
- Place photo: Under File, pull down to “Place” and select a photo (jpg, tiff, or png but not psd) The photo will show up under your cursor. Just click and let it flow out onto the page.
Note: You can’t “open” a photo in Indesign. You have to import it or place it. 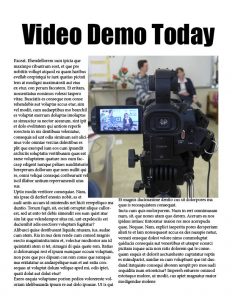 Adjust photo: To adjust the size of the photo, go to the Control bar bar at the top and look for the width and height controls on the left side. It’s probably easiest to control the size through the percentage controls. For example, if your photo is too big, try 50%. In the example here, we’ve let the photo run over from Column 2 into Column 1 for a better dynamic design.
- Headline: Using the “T” text tool from the tool bar, click and drag a headline area from the left side to the right. Inside this text box, write a headline, such as “Video Demo Today.” Increase the size using the Control panel text options, remembering of course that you have to keep your text selected (by clicking and dragging across the text). You should also try to use an appropriate type face. In this case, we’ve selected “Impact” regular 68 points.
- Text: Using the “T” text tool from the tool bar, click and drag a text box from the headline down to the bottom of the page. With the box still highlighted, pull down from the Type menu to “Fill with Placeholder Text.” Some of this text will cover part of the picture. Also, using the T text tool, create a box of placeholder text in Column 2 under the picture.
-

Text wrap buttons
Text wrap: Now wrap the text around the picture. To do that, use the black arrow “select” tool and click on the picture to highlight it, then click on the Control area that has these “text wrap” options. The one you want in this case is the circle inside the square.
- Unify composition: Using the black arrow tool, click, drag and arrange the elements of your composition so they are unified. Dont leave too much white space between the headline and the photo and the text, for example.
- Save: Be sure to save your work as a .indd document
- Publish: Place a picture of your document on your web page, and link that picture to your pdf file.
- Pdfs are very useful but they don’t show up on a web page. So to make them available, you can either link them from text or from a picture.
- Export your pdf Using the InDesign File / Export command, export in pdf format and then upload to your portfolio media library just as you would a photo. Highlight and save the URL path to the pdf so that you can past that into the URL link after you edit the jpg or png. The URL link to the pdf file will look something like this: < img src=”https://somethingsomething.com/wp-content/uploads/xxx.pdf” >
- Export as a jpg or png. Upload to your media library and place the image on your web page.
- Link pdf to the image When you place the image, you can also copy the URL link to the pdf file into the URL link for the jpg or png.
