Create & format a new image
The basic strategy when you learn to use a software application is to start with simple exercises and then work towards more complicated things.
Here we will create several shapes on individual layers.
You’ll need to save twice — Once for the “native” format (.psd for Photoshop, .xcf for Gimp) and once for a web compatible format (jpg for both). When you save in (or export to) a web compatible format, the image is flattened and you lose the layers, so that’s why we save in “native” formats as well as jpg. That way you can go back and edit your original file.
Adobe Photoshop
- Open Photoshop and create a new 5 by 6 image with 72 pixels per inch.
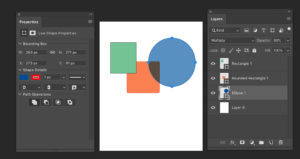
- Find the shape tools and place three or four shapes on the page.
In Gimp, use the select tools, click and drag, and then fill the foreground color. (See this Gimp tutorial – https://docs.gimp.org/2.10/en/gimp-using-rectangular.html) - Notice that you can change the colors using the properties pallet.
- Also notice that the the way shapes stack on the layers pallet. You can move the layers around and you can select different blend modes and opacities. The image you turn in should have blended layers and one layer with lower opacity, like this one.
- Save as a .psd to preserve layers
- Save as a jpg of 500 kb or less and upload to your portfolio
Gimp – Gnu Image Manipulation Program
- Create a new file of perhaps 5 by 5 with 72 pixels per inch resolution.
- Use the select tool in the upper left hand corner of the tool bar. Draw a simple square. (There is no shape tool, as in Photoshop).
- Select a foreground color
- Use the paint bucket tool to fill in the color.
- Use the opacity slider in the layers menu (lower right) to adjust the opacity.
- Create several other squares or ovals of different colors and opacities. Notice that the the way shapes stack on the layers pallet. You can move the layers around and you can select different blend modes and opacities. The image you turn in should have blended layers and one layer with lower opacity, like this one.
- Export as a jpg of 500 kb or less and upload to your portfolio pages.
More
- Shape tools and Gimp
- Create a simple floating logo in Gimp
- Digital flyers for Radford University telescreens:
- Landscape (horizontal) not portrait (vertical) orientation
- Document Size: width 1280 height 720
- Dark background with lighter lettering
- Save as jpg (from Photo editing application) or pptx (from Powerpoint)

