Working with layers to combine images
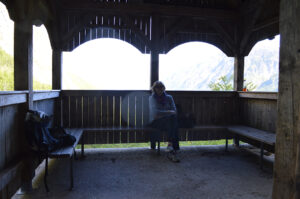
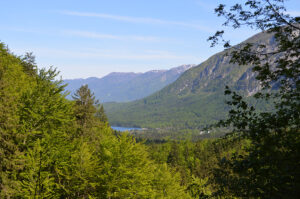
Let’s combine two photos taken in the Julian Alps. One was taken inside an open shelter along a hiking trail and the other was taken of the view just behind the shelter. As you can see, the foreground in Julian 1 is dark and the background is washed out.
- To begin the exercise, select Julian1 and Julian2 on this page and move copies of them to your desktop.
- Then open Julian1 in Gimp or Photoshop
- Next, import Julian 2
- Photoshop: File > Place embedded … then select Julian2.sm.jpg
- Gimp: File > Open Layers
In both PS and Gimp, the new layer arrives with Free Transform already on, so you can resize Julian2 in a way that is the best fit.
- Special step PS: Usually you need to switch to a “rasterized” view for editing. Layers > Smart Object > Rasterize (bottom).
Special step Gimp: Add an “alpha channel” to the layer with Layer. >. Transparency > Add Alpha Channel. This Alpha channel allows parts of the photo to be transparent. - Use the level adjust command to lighten the exposure on Julian1.
- In the Layers pallet, click and drag to move the Julian2 layer UNDER the Julian1 layer.
- Next we want to remove the washed out areas around the windows so we can see the Julian Alps behind. Select (click on) the Julian1 layer. Use the “magic wand” tool or other select tools to highlight the window area, then use the delete key. You can also use the eraser tool. You should end up with transparent spaces in Julian1 on Layer 1, and you should start seeing Julian2 come through the window areas.
- Photoshop: Select tool PS Magic wand tool, click on white window spaces and then hit your keyboard delete command. This should reveal the underlying layer.
- Gimp is similar — use the Fuzzy Select Tool, click on white spaces and then hit your keyboard delete command. Problems? Some versions of Gimp are not working on some versions of the Mac OS. In that case, use the eraser tool rather than the fuzzy select tool. Zoom in and out and touch up parts of the window areas with an eraser.You can also resize (PS Edit / Transform, Gimp = Image / Scale ) or do other things to either layer.
- Save your psd file as a backup.
- Merge the layers.
Export your final combined file as a png, heic, Webp or jpg. and post it on your portfolio site as Ex 2e.
More info
Photoshop tutorials
- Combine images in Photoshop
- Layer basics for Photoshop
Gimp tutorial on combining photos


