For class credit on this assignment:
- Create a free or paid WordPress CMS site
- Email the site URL to the instructor (eg: https://whatever_name_you_make_up.wordpress.com)
- Complete in first week of class.
There are two methods for creating the basic site:
- Create one for free at https://www.wordpress.com/free
(Not the best option in the long run if you need a portfolio site and expect to learn CMS systems). - Buy a basic low-cost WordPress site at Bluehost.com, GoDaddy.com or other hosting platform. (Bluehost has simple site fees starting at $3 per month). If you’re going to take COMS 326 Data Driven Web Design, you’ll probably want the basic WordPress package.
(We will not be using Wix, Squarespace or other one-size-fits-all site templates. Nor will we be using higher-end CMS platforms such as Drupal or Joomla. The WordPress application is used by nearly half of all web sites and is the best place to start).
To create your WP site:
- This can vary, but the point is that if you want a free WordPress.com site, be aware that this company will try to get you to pull out your credit card. Dont.
- Point your browser at wordpress.com and click on the middle button that says “Start Your Website”.
- Be aware that this site uses “dark cycles” to trick you into thinking you need to pay for their services. You definitely do not. Everything should be free when you start off.
- Click through on the second page where it says “Get Started“ and enter your email, username and password.
-
- Select a user name that will end up as part of the URL of the site, that is: “mynamehere.wordpress.com”
- If the name is already used, it will ask you to select another one
- Enter a password you will remember.
- Somewhere in all this you’ll have to specify that you want the FREE plan. This changes a lot and you have to be careful.
- Select a user name that will end up as part of the URL of the site, that is: “mynamehere.wordpress.com”
-
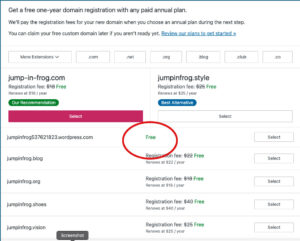
- Choose a Domain — You’ll be asked to set up a domain name. Most of the options will be “First year free.” What you want is “Free.” Not just the first year free. Usually there are big bright buttons that say “Recommended.” Uh-huh. Nice try, WordPress dot com.
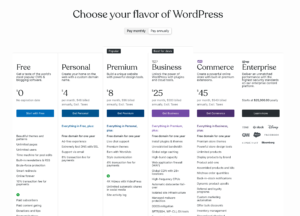
 Choose a Plan — If you have clicked the right “free” space, where there are no charges listed, you will be taken to a page with four obvious options and a fifth option at the top in very small letters. It’s not fair, it’s a dark cycle design, but obviously they want you to spend your money. (Note: If the third page does not have the line “Choose your plan or start with a free site,” you may have clicked on the wrong button in step 2.
- Yes, “dark cycle” designs are where users are “steered” to the options that are best for the company. Get used to it, and learn to spot it and get around it.
- Confirm your email: Once you have a site name, WordPress.com will send an email to your main account to confirm your address. Reply to the email and your account is ready
- Select a Theme: This is pretty obvious. Again, all options should be free.
- “Publish” your site so that it can be seen by everyone. Sometimes this requires pushing the “publish” button two or three times.
- Let your instructor know the site URL
- Important notes
- This is free. If you get to a place where they are asking for credit card information, you’ve gone down the wrong path.
- Eventually you will want to buy some of their services or start using a full service web host, but you don’t need that when you start off.
- As you learn more about web sites and WordPress, you will be able to use it for other classes. That’s fine. This is the basis of your professional portfolio, which you will need to help you look for work when you graduate.
10. How to log in: Once you have a site set up, you have to log back into the computer using the username and password you already entered in wordpress. The URL for the login is your regular URL followed by /wp-admin
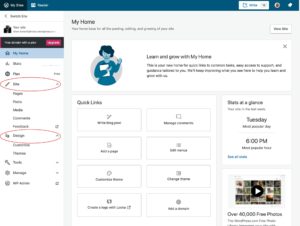
11. Once you log in to your WordPress site, the first screen you see will look something like the image to the right. (Click this image to enlarge so you can see details). This is the main dashboard.
Notice that there are top categories (Home, Stats, Plan, Site, Design, Tools, Manage and WP Admin).
The two most important categories for now are Site and Design. Let’s start with the overall Design and then start creating content for the Site.
Design / Themes: You may already have a Theme, but if you want to change it click on “Design / Themes.” In this case Here we’ve selected the “Colinear” theme because it is organized and has space for a second column called a sidebar, which is labeled “Widget area” above.
-
- NOTE: There are thousands of free themes out there. If you dont like the ones that are immediately available in your choices, just click “Add New Theme” and then select and upload your theme).
From here, go on to Assignment 1.2
Site / Pages, Posts, Media: Add a new post and a new page. These are the platforms that hold your media. Due first week(s) of class.
Full instructions are here on this site.
Also – WordPress has new video tutorials that seem worthwhile.


