Animation with Photoshop
One of the easiest ways to create an animation is to use the Adobe Photoshop frame animator.
Start by opening Photoshop and push the big blue button: “Create a new file.”
We’re going to use a 728 pixel wide 90 pixel high banner. ( That’s one of the standard sizes of the Interactive Advertising Bureau. ).
Once you have the new file open, follow these directions and click through to the image file for closeups.
 # 3 – Create Frame Animation 1 Make sure you are in the “Motion” Workspace. (Pull down from top menu “Window” to Workspace and then slide over to Motion).
2 Open the timeline (Pull down from top menu “Window” and release on “Timeline”).
3 Make sure your timeline is set to “Create Frame animation.” If it is set to “Create Video Timeline, pull down the bar and you’ll see “Create Frame Animation.”
|
 #4 Frame animation ready 4 Push the button at “Create Frame Animation” and your animation timeline should have a blank timeline frame. Now you are ready to start.
|
 #5 position first elements 5 With the first blank frame highlighted, add elements to the 728 x 90 pixel banner. Here we are going to add a blue circle and some dummy text.
|
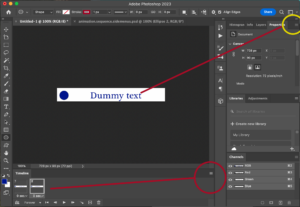
 #6 and 7 Copy frame1 (menu with red circle). Then change the text on frame 2 (menu with yellow circle). 6 Next copy the frame so there are two identical frames using the frame menu (red circle).
Then change the elements in the second frame. So here we are moving the blue circle to the right.
7 We are also and decreasing the opacity of the text using the side menu in the layers pallet (yellow circle). |
 #8a tween (white circle) 8 With the second frame highlighted, press the “tween” button (white circle)
|
 #9 tween dialogue box 9 You’ll get a dialogue box that lets you add frames in between. Here we are adding 5 frames between the first and second frames.
|
 #10 your animation should look like this 10 Now you should see changes in the elements of the frame. You can control the timing of the animation and the looping of the animation with controls under the frames. 9 With the frames added, you should be able to press the “play” button and see the effect of the motion and opacity changes. |
 Final test animation 11 The final animation should look more or less like this: |
 #12 File / Export / Save for Web (Legacy) dialogue box 12 Now pull down File / Export / Save for Web (Legacy) and you’ll see this dialogue box. Save as a “gif” and be sure to label the file with the .gif suffix. You can upload this gif directly to wordpress.com or other websites. It should animate when you view it through the browser. |


