
After y0u’ve edited your video in Adobe Premier, Final Cut Pro, or other video editing application, you need to prepare it for web distribution.
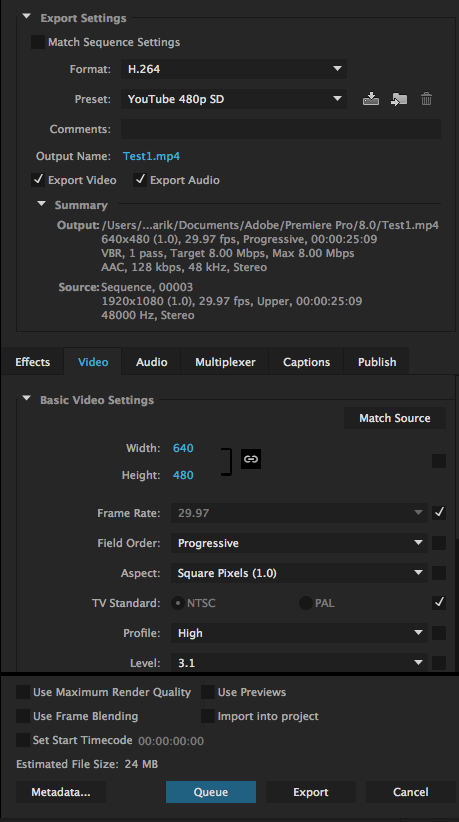
Premier export controls
In Adobe Premiere Pro, DaVinci Resolve, or other video editor:
- File > Export > Media for export settings.
- From the Format pop-up list, you need H.264
- Select a ready-to-use setting. There are several for YouTube and Vimeo and other video serving systems.
- Here we have selected YouTube 480 pixels but this is low res. You can select YouTube 1080 for higher resolution if you are using systems with moderate to high bandwidth.
- (Optional) Select “Use Maximum Render Quality.”
- Name your file under Output Name.
- Click the Export button to create your file and save it in an easy to locate place on your computer, like your Desktop or Documents.
- For more information on formats, see this YouTube help page.
Next, log into your YouTube account.
- Click on the Upload icon (arrow pointing upward)
- Select a file and click upload
- Select privacy settings and provide information about the video.
- Depending on the size of your file and your internet bandwidth, this may take at least a few minutes.
- Once the video is in place, look for the “Share” button on the lower right side underneath. There are two things to look for.
- One is the simple URL, which is just the “https://youtube.com/yadayada”
- The other is an embed tag that might look like this: <iframe src=”https://www.youtube.com/embed/M4pvm1W4070″ width=”560″ height=”315″ frameborder=”0″ allowfullscreen=”allowfullscreen”></iframe>
With wordpress.com (free student accounts)
- Start editing a new or existing page. Get a “new block” by clilcking on the cross inside the square.
- This “new block” function has lots of ways to insert images and galleries and video and audio files. Look for icons for “YouTube.
- Insert the URL from your YouTube share.
- If it’s working you should see your video on the page right away.
With Bluehost, GoDaddy or other hosting accounts
- You may still need to embed using the <iframe …> tag.
- To use the iframe tag, first click on Embed
- Copy the embed tags, which should look like this: <iframe src=”https://www.youtube.com/embed/M4pvm1W4070″ width=”560″ height=”315″ frameborder=”0″ allowfullscreen=”allowfullscreen”></iframe> .
- Paste this into the “Text” or “Html” side of a WordPress document.
- To modify the size or placement of the video, edit the text in the embed tags. For example:
- width=”560″ can be changed to width=”480″ or other sizes
- you can add align=”left” (or “right”) to have text wrap around your embedded video \
So, for example, the following raw video at COMM WEEK 2017 was shot and then uploaded to YouTube. The embed tags from the share function at the YouTube site were then pasted into the “Text” side of this page.
This is the simple URL:
“https://www.youtube.com/watch?v=t9Jmf6x4H5s&feature=youtu.be”
This is the original embed tag:
<iframe width=”560″ height=”315″ src=”https://www.youtube.com/embed/t9Jmf6x4H5s” frameborder=”0″ allow=”autoplay; encrypted-media” allowfullscreen></iframe> .
But then two things needed to be edited. The width was changed and the alignment was inserted. See the difference?
<iframe src=”https://www.youtube.com/embed/t9Jmf6x4H5s” width=”480″ height=”315″ frameborder=”0″ allowfullscreen=”allowfullscreen” align=”right”></iframe>
Livestreaming video
It’s easier than you’d think to take an event live on YouTube, Facebook or Zoom.
YouTube asks you to register your account for livestreaming 24 hours in advance, but unlimited streams are free.
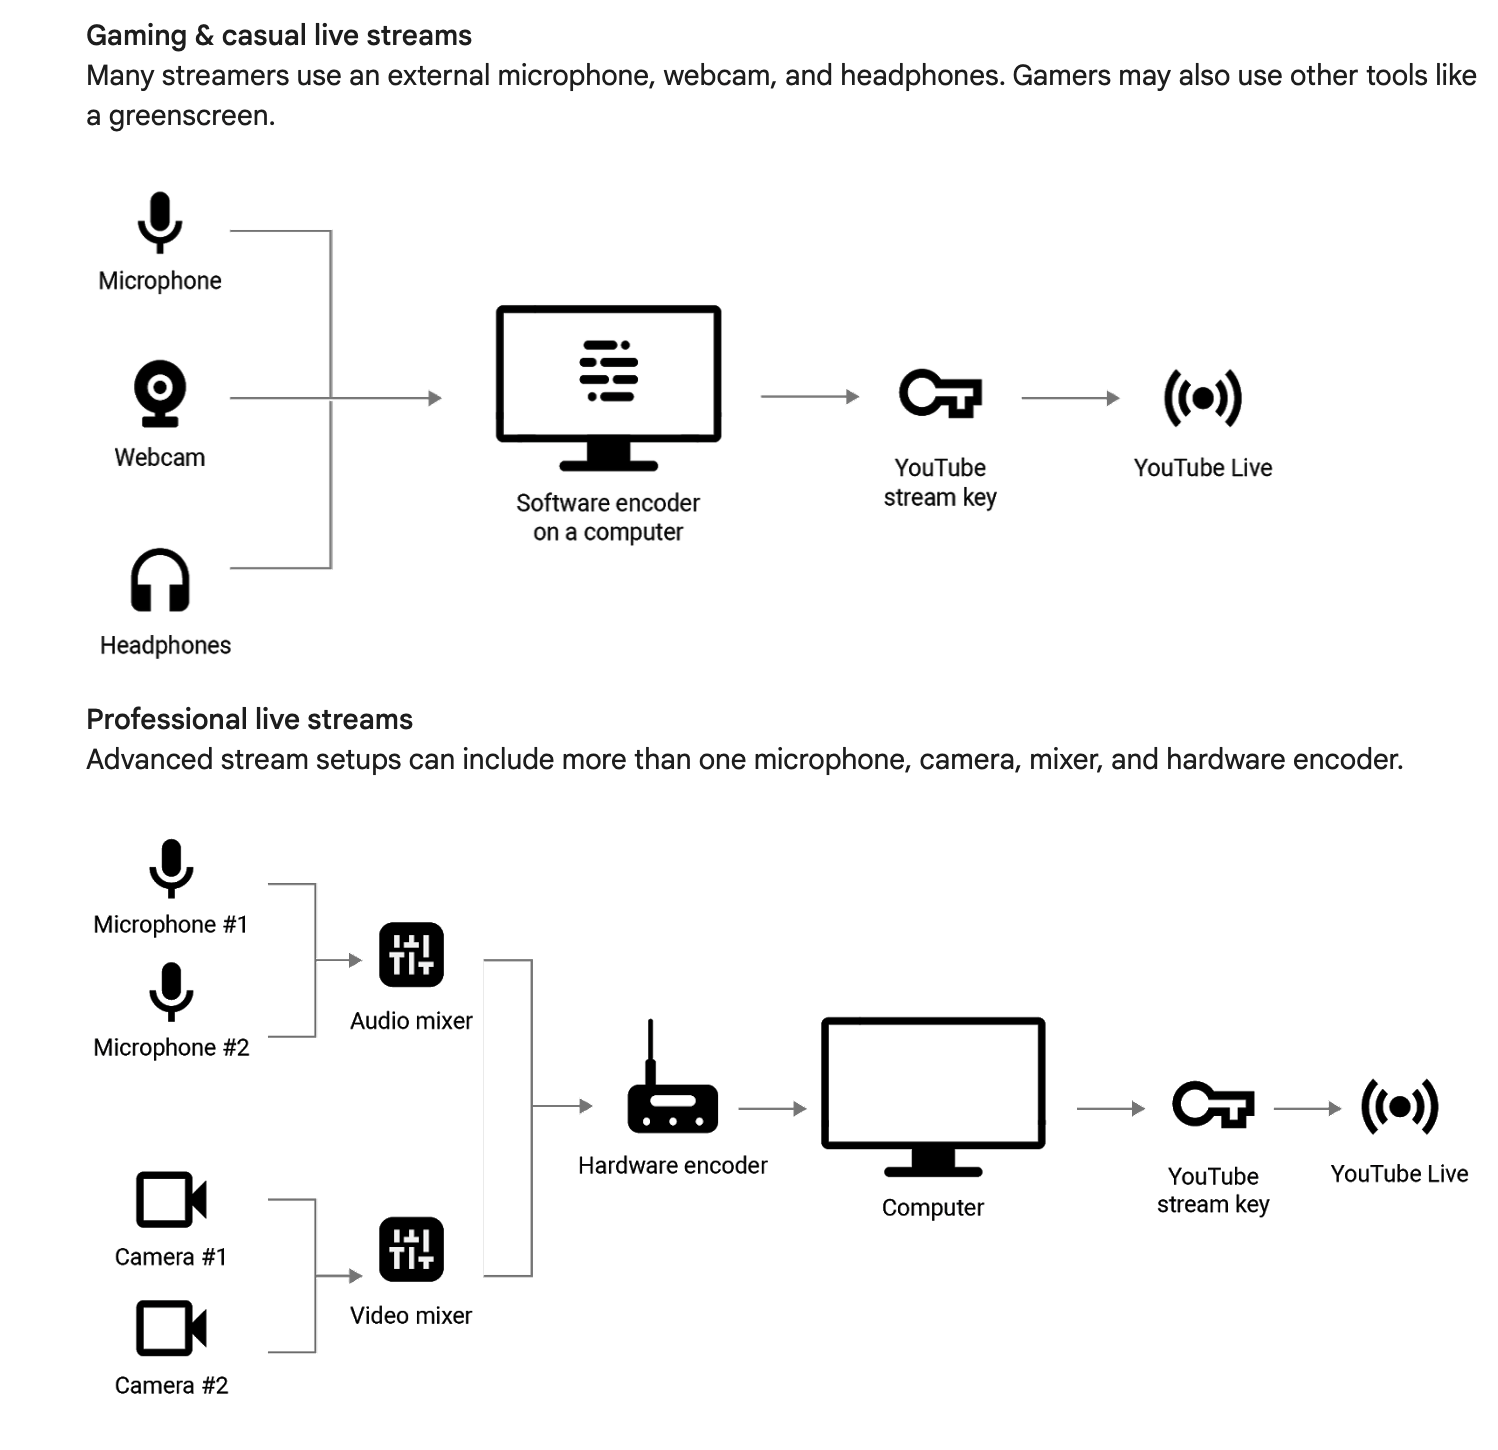
YouTube diagram describing live stream setup. Switchers, mixers and encoders are relatively cheap these days.
Facebook has made live streaming simple. Navigate to the page, group, profile or event where you want to publish your live stream. Then tap the Live button at the bottom of the post composer. Add a description to your video. You can also tag friends, check in to a location and add a feeling or activity. Tap Start Live Video, then tap Finish when you want to end.
Zoom conferencing software already is live streaming. Free livestreams are limited in time and bandwidth, and a paid individual account starts around $60 per year. The downside of zoom is that the audience also must have zoom software.
Vimeo All in One – There are a number of serious challenges involved in scaling up an event from several dozen in a classroom-sized group to several hundred in a conference, and Vimeo’s idea with Virtual Events is to make it easier to handle these. They have a ticketing gateway (Eventbright or several others) and a way to display recorded and simultaneous livestreams from a multi-event conference. The event can also be broadcast on multiple streams (Twitter, Facebook, YouTube etc).
COPYRIGHT ISSUES
Sometimes when we work on instructional projects we use material generated by other people.
To prevent your sound or video substitution project being blocked for copyright reasons, you may wish to upload with disclaimers such as “DISCLAIMER: I do not own the footage (or music) used in this video. All rights reserved to its proper owners.”
Usually under the Fair Use law, educational sound-substitution and visual substitution projects for university students are not considered copyright infringements.